17 November 2013

violet flower

African Violet is blooming!

16 November 2013

cleaning fish and feeding plants

how to clean a betta fishbowl
Friday is the day I clean out my Betta fishbowls, and water plants. The two go hand-in-hand because I give the plants the water that comes out of the fishbowls. I thought to make a step-by-step post here, as I've learned a few things in the past months about doing this. What follows is just how it works best for me. To clean the bowls, I first get out all the materials: an empty, clean milk jug (1 gallon), betta water conditioner, a fish cup with a lid (the fish come from the pet store in these), liquid thermometer, and a five-gallon bucket plus a few extra watering cans.

Start with clean hands. First step is to lift out the decorations and/or plastic plants, scoop some water out into a bucket (so the fishbowl doesn't overflow when you put your hand in) and gently catch the fish in the cup. Lower the cup into the water sideways, wait for the fish to swim into it, then tip it upwards and lift out. Lid must be placed on- these fish can and will jump! I once came home and found Pinkie on the floor, he's lucky to have survived that.
Side story: I used to put the cup in the bowl suddenly, and the fish would get pulled into the cup by the sudden backflow of water. But then I learned that if bettas get roughed around in the water like that, it can mess up their swim bladder and throw off their balance. Quite a few times on cleaning day, my fishies would be listing near the top or bottom of their bowl afterwards, nosedown and seemingly unable to keep themselves upright. They're usually all right again within a day, but I didn't like seeing them go through that stress. So now I'm very gentle.

Next I remove the decorations from the bowl and rinse them under hot water.
Then pour all the water out of the bowl into a bucket or large watering can.
I pamper my plants in a way. I give the initial poured-off water to plants that are sensitive to chlorine and do better with the aged water that has sat in fishbowls all week. This goes into one watering can. The straight-out-of-tap water from rinsing gravel (next step) goes into a separate bucket, for the other plants.
Clean the fishbowl and gravel by running very hot water into the bowl, agitating it with one hand to stir up any debris or fish poop, and pouring it off into the bucket. I rub the inner surface of the bowl with my hand as well, in case there's any algae or something. NEVER use soap! It will kill the fish. Hot water only. I do this step two or three times until the stirred water looks clean.
Replace the decorations into the bowl and smooth out the gravel.
Fill the gallon jug with warm water, adding proper measured amount of betta water conditioner. Pour this new water into the clean fishbowl. If you cup your hand inside the bowl and pour over your hand, it will break up the flow and avoid knocking over all the decorations or plants you've arranged in there.
Test the temperature of the water- for bettas (as far as I know) it should be between 74 and 86 degrees. Higher than that will kill your fish, as we have learned from sad experience. If the water is too warm, I let it sit a while or sometimes even put the jug in the fridge to cool it down.
I dry off the outside of the bowl, because I don't like water spots on the glass.
Replace the bowl in its usual location. The next step is to float your fish in the bowl, so the old water he's in will be the same as the new water in the bowl. A sudden change in water temperature can put the fish into shock. To do this, I use a plastic sandwich baggie. Remove the lid from the fish cup and put the baggie over the entire cup.
Using two hands, very gradually tip the cup sideways, holding the baggie tight to the cup sides with one hand, supporting underneath the baggie with the other, turning until the baggie and cup are reversed and the fish is floating in the baggie under the cup. Dumping the fish suddenly from the cup into the baggie can cause that problem with swim bladder balance that I mentioned earlier.
Now grasp the edges of the baggie with one hand and slowly ease the cup out with the other. Take your fish in its baggie
and float him in his bowl. I always leave mine there for at least twenty minutes- while I clean the next bowl or water the plants.
When some time has passed, test the water temperatures by dipping your fingers from one hand, one in and one out of the baggie. You can easily feel if the water is the same or one side is colder. 
When the fish-in-baggie water is the same temp as the bowl water, slowly and gently tip the baggie until he can swim out into the bowl. Replace the lid on top.
For my bowl that has a plant growing on top, there are a few extra steps. I set the lid-plus-plant over a mixing bowl to keep the roots from getting damaged, while I'm cleaning the fishbowl.
Before replacing it, I rinse the roots off just in case there's some debris or dead plant matter. Usually I rinse off the lid as well.
This may sound like a lot of steps, but it's become routine and I get it all done within an hour or perhaps an hour and a half. Including watering the plants.
I do this while the fish are floating in their baggies. My tender or finicky plants get the water that first came out of the fishbowls. This is a must for my Dracanea and Spider Plants. The water from rinsing gravel is usually too hot to go on plants right away- the shock of temperature difference can hurt the plants (just like it does the fish). If I don't want to wait for it to cool, I dump ice cubes in.
In the summer I add liquid plant food to the bucket before pouring the water into watering cans and giving it to my plants, but in winter when they have less light and are not growing much, I just give them the plain fish-water. I figure the fish waste and little debris from their uneaten food is a good bit of extra nutrients for my plants. Fish cleaning happens once a week, and most of my plants are on a once-a-week or once-every-two-weeks watering schedule. So it makes it easy to remember. With two bowls to clean, I usually have more than enough water for all the plants, including those outside.

Happy fish!
and happy plants.

15 November 2013

ponytail

This rescued plant, which I have not featured much here yet, is beginning to look beautiful. When I first brought it home from abandonment outside someone's garage, a lot of the foliage was broken and ragged. I trimmed the ends into new points with scissors. It needed a spot without clutter around it, to really let the grace of the leaves show. The top of this little bookcase is just right.
But I think it might also be the best spot for my aloe vera, now hanging out on the kitchen counter...
I am still not quite sure if I have identified it correctly, but think it is a Ponytail Palm. Mine seems to have longer and fewer leaves than the pictures I see online, but that might be because I've never trimmed it, which encourages fuller growth. As you can see from this closeup, there are two plants sharing the container, and the stems are really taking off lately. At some point I will have to divide them up, but if I have the right identity, this plant doesn't mind being crowded.

14 November 2013

boston fern

The Boston Fern seems particularly happy nowdays. It has a constant flush of new, tender leaves standing upright, and when I peer into the heart of it quite a few fuzzy little fiddlheads uncurling. I think it likes the humidity from drying clothes. I often hang my laundry on racks and chairs around the kitchen and position them near the fern. I swear I can see its foliage lifting up more through the course of laundry day as it absorbs the moisture from the air...

13 November 2013

coleus

I'm not sure if my Rex Begonia Coleus is happy or not. It's definitely growing more, but seems too leggy and small-leaved compared to other pictures I see online. I've moved it once again, onto the desk where there is bright indirect light. It seems to be perking up a bit and I'm thinking of cutting it down to encourage more branching, but haven't brought myself to do that yet. The pink and green foliate so pretty I'm loathe to cut it.

12 November 2013

aloe vera

I'm pleased with the growth of my Aloe Vera plant! It had been sitting on a windowsill in the gap between a cupboard and the pane of glass; I didn't realize how big it has grown until I moved it out into the open to cut the end of a fleshy leaf off (the soreness from my bruised and scraped knee disappeared almost immediately after I applied the plant's gel). It has grown a lot! I think it needs a new pot soon, and definitely space to spread itself out. I need to find a new location for it, so some other plants will probably get shuffled around while I figure that out.

It's actually got a lopsided growth habit right now. I held a leaf for the above photo; it really looks like the one below, from being crammed into the windowsill gap. I'm going to prop it against something to hold upright and also position so it leans towards a light source and perhaps straightens itself out...

11 November 2013

mint

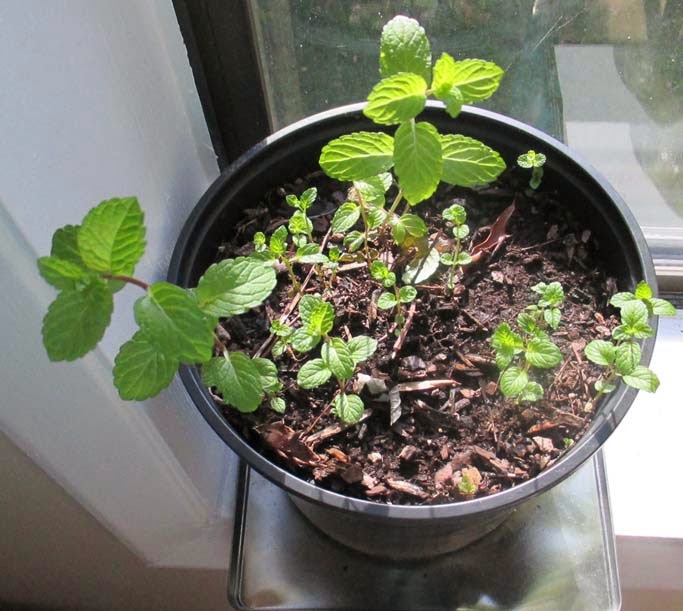
I've rescued a pot of Mint that had been left on my friend's deck all summer. With more frequent waterings it's starting to come back. I'm expecting it to be a bit leggy all winter, in the lower light levels, but come spring I'll cut it back and put outside in hopes of better growth.

10 November 2013

two geraniums

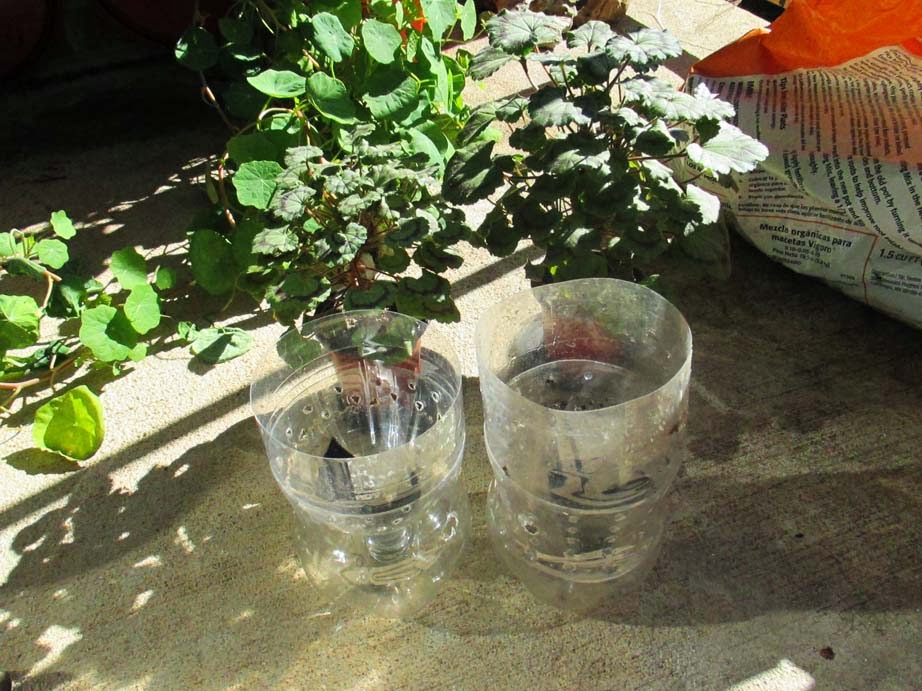
I've potted my two windowsill Geraniums grown from cuttings, into a pair of empty SIP soda-bottle planters.
Their growth habit is rather upright for my taste, but I'll spread the stems out with spacers soon.

09 November 2013

cuttings update

My Schefflera cuttings have been sitting in a quiet corner, indirect light on their plastic house. I opened it today to check on them, noticed quite a few yellowed leaves falling. Turns out they were coming off the larger cuttings, and one even had mold growing on the cut end. So I threw those out. Don't want mold spreading.
The smaller two look quite healthy, nice bright green and no fading leaves. I've left those sealed under plastic, it might be a few more weeks before new growth shows, when I'll know they have roots established.

pepper twins

The little Pepper plants continue to look well. Their new leaves are dark green like supposed to be. I doubt I can keep them well all through the winter, but it's nice to have them around for now. They usually get shuffled twice daily, to stay in areas of direct sunlight through the kitchen window or sliding glass door.

cyclamen

I think I haven't done right by my Cyclamen again.
I thought it would put itself into dormancy and die back entirely, but it never really did. It has kept growing with a new flush of young leaves, but it's very leggy. I've tried relocating it with no improvement. Did some more reading and it seems I should have forced it to go dormant by witholding water until it died back all the way, then watered it regrow. Supposedly it won't flower well if not made to go through the dry spell. But I see the leaves curling again. Think it needs a water/light adjustment. I checked and there are no mites (thank god).

08 November 2013

petunias

I gave up on keeping these Petunia cuttings going. They continue to look peaky, the color pale compared to the outdoor plants- and when I look close there are aphids all over.
I threw them away. The planter box still makes a few flowers, so I've left it be for now but will soon dump the soil and plants out into sealed trash bag- want to keep the infestation from spreading or (hopefully) coming back next year.

07 November 2013

pleasant surprise

I guess I'm finally doing right by my african violets (less water!)
This one
has a little flower bud peeking out!

06 November 2013

new thing!

My sister gave me this awesome marble mortar and pestle for my birthday last month.
The first use I put it to was crushing eggshells into tiny bits to mix into some potting soil.
It went so much faster and got a finer grind than my old method (base of a drinking glass into a small bowl). Wonderful what using the right tool will do!
I used the eggshell/soil mix to pot up my young Stevia plants. They needed it; the roots were coiling around the base of the smaller pots.
I put the two together into one larger pot and it seems my efforts to remember to pinch frequently is working. I like the look of the plant now.